1. Thermostat Installation

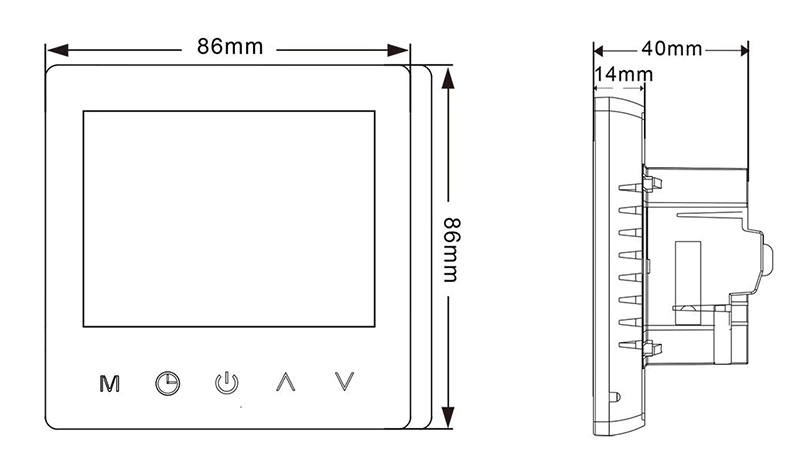
1.1. The set includes a control unit and a moisture-proof temperature sensor. Can be installed in a standard junction box with a depth of at least 25 mm. The dimensions in the following figure should also be taken into account.


1.2. The mounting frame and screen must be separated to install the thermostat. To do this, hold the screen and push the rear part of the frame down by approx. 5 mm. Then disconnect the plug that connects the two parts.
1.3. The wires are connected according to the diagram:
1 – heater phase *
2 – heater zero *
3 – mains zero
4 – mains phase
___
1 and 2 have a thermostat for connection, the order of the wires is not important.
* In most cases, the polarity of the heaters does not matter
The maximum permissible load is 16 amps, or approx. 3,500 watts at 230 volts. In doing so, attention must be paid to:
1) the ends of the fiber optic cable must be sleeved or tinned. Plank wires do not have to be sheathed.
2) if the power exceeds 2000 W, the cross-section of the cable must be at least 2.5 mm 2 .
3) the heating device must be earthed
After connecting the wires, install the thermostat in the junction box, fasten the display connection cable and push the display back to its original position.

2. Setting the thermostat

2.1. Characters on the screen:
- time
- week day
- current temperature
- period
- setting touch buttons
- temperature target
- child lock
- switch-on indicator (heating element energized)
- operating mode (manual or automatic)
2.2. To set the time, tap the clock image once (button 2 in the bottom row). The number of hours will then flash, press the up or down arrows on the right to select the correct hour. Touching the image of the next clock activates the minute display. Same arrows to dial the number – up, down. The third time you touch the clock, the day of the week selection is activated. Touching the fourth clock saves the setting.
2.3 There are two operating modes: manual (handwritten indicator) or automatic (time and temperature).
2.3.1 . To activate manual mode, touch the “M” key until the hand symbol appears in operating mode. Then use the arrow keys to select the desired temperature.
2.3.2. The indicator for the automatic mode is the clock image. The following preset is applied when it is lit.
| Period | Symbol | Start time | Temperature | |
|---|---|---|---|---|
| Working day (ER) | 01 | 06:00 | 20 ° C | |
| 02 | 08:00 | 15 ° C | ||
| 03 | 11:30 | 15 ° C | ||
| 04 | 12:30 | 15 ° C | ||
| 05 | 17:00 | 22 ° C | ||
| 06 | 22:00 | 15 ° C | ||
| Weekly exchange |
01 | 08:00 | 22 ° C | |
| 02 | 23:00 | 15 ° C | ||
To change the preset, turn off the unit and then hold down the “M” and clock for five seconds. The setup menu will then appear with the preset fields visible, the active field will flash and can be changed with the arrow keys. The “M” key moves to the next field. When setup is complete, select “M”.
2.4 The device has frost protection. The appliance switches on when the temperature drops below 5 ° C and switches off when the temperature rises above 7 ° C. By default, the overheat protection is activated at 60 ° C.
2.5 The advanced setting allows you to change the operating parameters of the device and make the initial settings. To open it, turn off the device and tap the “M” and down arrow keys. Select “M” to change the device selection. There is a power key to exit the mode.
| # | The device | Default value | Arrow keys |
| 1 | Temperature correction | -2 | affects the temperature -9 … +9 ° C |
| 2 | Andrur regime | IN | IN: internal sensor; OU: external sensor; AL: Both sensors |
| 3 | Overheat protection | 60 ° C | 5 … 60 ° C |
| 4 | Circuit hysteresis | 1 ° C | 1 … 5 ° C |
| 5 | Frost protection | IS | On: 01; Off: 00 |
| 6 | Switching periods | 01 | OF: off; 01: 5 + 2 days; 02: 6 + 1 days; 03: 7 + 0 days |
| 7 | Maximum temperature | 40 | 30-90 ° C |
| 8 | Minimum temperature | 10 | 5-20 ° C |
| 9 | Restore factory settings | Hold the up arrow for 5 seconds |
3. Interface the thermostat with the qilowatt.it app
http://app.qilowatt.it is interfaced according to the device connection instructions . The thermostat can be switched on and off automatically via the internet via the qilowatt.it app. The temperature set for the period corresponding to the switched-on thermostat applies.


